Imagine harvesting fresh, pesticide-free greens and herbs year-round with almost 95–98% less water than a traditional garden. This “future farming” approach is driving big growth: the global aeroponics market was about $1.1 billion in 2023 and is expected to grow over 15% per year as more home growers and urban farmers adopt this high-tech method.
Definition of Aeroponic Grow Kits
An aeroponic grow kit is a self-contained gardening system that grows plants without soil. Instead, plants are suspended with their roots dangling in air, and a pump repeatedly mists the roots with a nutrient-rich water solution. This method delivers oxygen and nutrients directly to the roots, which speeds up growth and boosts yields.
In fact, studies show aeroponic gardens can produce roughly three times as much food as an equivalent outdoor plot of soil. These kits also save enormous amounts of water and space. For example, aeroponics uses over 95% less water than conventional farming and requires far less land by growing plants vertically.

Modern aeroponic grow kits bundle everything you need – pumps, misters, reservoirs, lights, and a frame – into one unit. This guide will explain how aeroponics works and break down the different kit styles (towers, boxes, tents, etc.). By the end, you’ll know which type of aeroponic system fits your space, budget, and gardening goals, so you can start growing fresh produce on your shelf, balcony, or patio.
Understanding Aeroponic Kits & Core Components
Aeroponic gardening works by misting plant roots with a fine spray of nutrient solution. In a typical setup, each plant sits in a small net cup or collar, and its roots hang down into a sealed chamber. A submerged pump constantly feeds water from a reservoir up to spray nozzles.
These nozzles atomize the nutrient solution into a mist that coats the exposed roots. Because the roots are suspended in air, they get plenty of oxygen. This direct access to oxygen and nutrients causes plants to grow very quickly.
Every aeroponic kit contains several core parts
i. Reservoir & Water Pump: A tank holds the nutrient-enriched water. A submersible pump in the reservoir sends this solution up into the grow chamber. The pump usually runs in cycles, pushing solution to the nozzles at set intervals.
ii. Mist Nozzles (and High-Pressure Pump): The pump forces the nutrient solution through special spray nozzles, creating an ultra-fine mist. Some advanced kits use high-pressure pumps (hundreds of psi) for an extra-fine spray. The mist delivers food and water directly to the root hairs.
iii. Timer and Controller: A timer is often the system’s “brain,” turning the pump on and off to create misting cycles. For example, beginners might set it to spray for a few seconds every few minutes. Getting the cycle right is critical: too little mist will dry out roots, too much can drown them. Good kits allow you to adjust or program the mist on/off intervals.
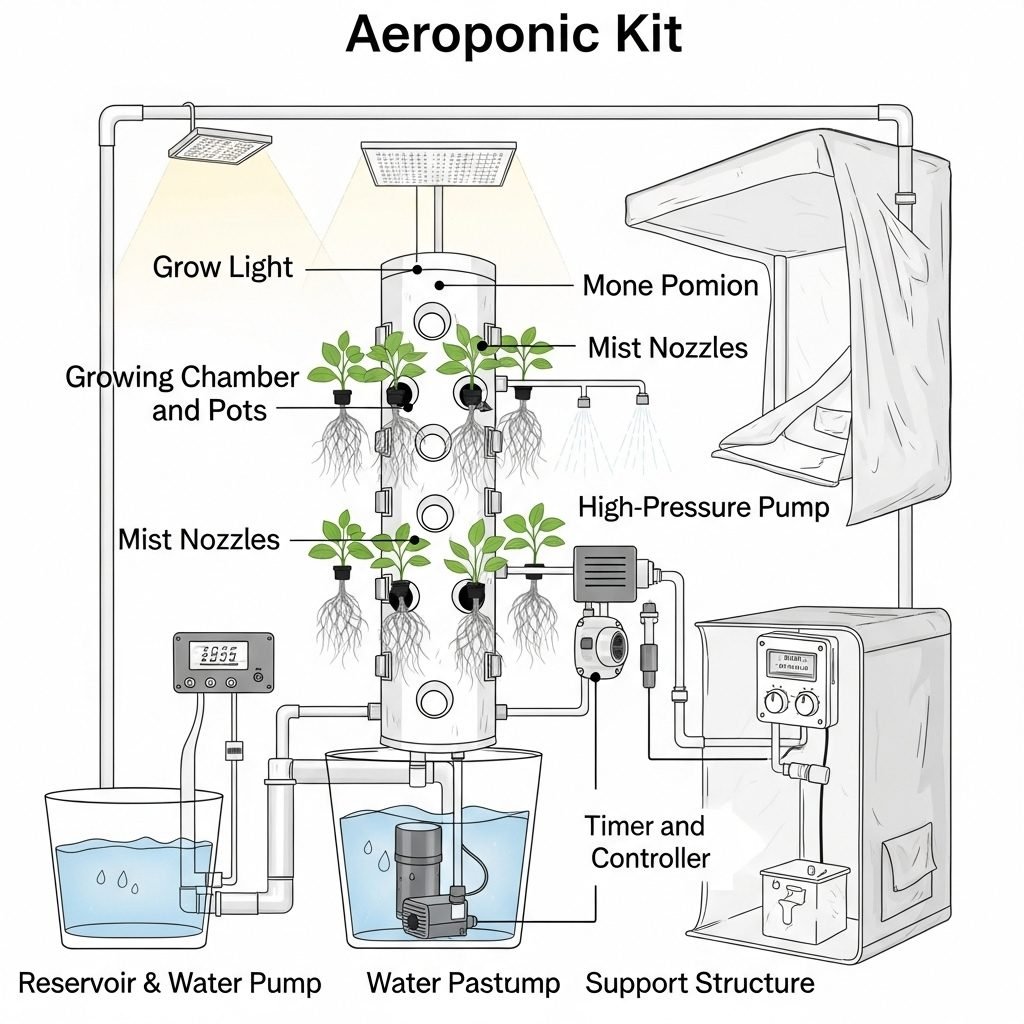
iv. Growing Chamber and Pots: This is the enclosure where plants grow. It may be a tower, a rack, or a flat panel, with holes (net cups or cloth collars) to hold each plant. The roots hang freely inside this chamber. Many kits use small starter plugs (like rockwool or coco coir) in net pots to hold young plants before roots reach the spray.
v. Grow Light (for indoor kits): Because most aeroponic kits are used indoors, they include artificial lights. High-efficiency LED grow lights are common. LEDs provide the needed light spectrum for photosynthesis without heating up the space. Proper lighting is critical – plants typically need 12–16 hours of light per day.
vi. Support Structure: Finally, a frame or housing holds everything together. This could be a simple vertical tower, a rigid box cabinet, or the poles and fabric of a tent. The structure keeps the system stable and (if enclosed) blocks outside light and pests.
Table: Essential Components of an Aeroponic Grow Kit
| Component | Function | Typical Material | Maintenance Tip |
|---|---|---|---|
| Reservoir | Holds nutrient solution | Plastic/Fiberglass | Clean every 2 weeks |
| Misting Nozzles | Spray nutrients onto roots | Brass or Plastic | Check for clogs weekly |
| Timer | Controls misting intervals | Digital | Test settings monthly |
By combining these parts, aeroponic kits create a clean, “set-it-and-forget-it” micro-environment for plants. Because everything is automated, you don’t need soil, weed control, or frequent hand watering. The closed system also recirculates unused nutrients, making it very water- and nutrient-efficient.
Types of Aeroponic Grow Kits
As aeroponics becomes more popular, the market now offers many kinds of grow kits, each designed for different spaces and skill levels. In 2025, the global aeroponic systems market is valued at around $1.8 billion, with rapid growth in home-based vertical farming setups.
Aeroponic Grow Towers
Aeroponic grow towers are tall, cylindrical columns with planting holes along the sides. Often made of stacked sections, a typical tower holds dozens of plants around a central column. A pump in the base sprays mist up through the middle.
Best For: Leafy greens and herbs (lettuce, kale, basil, mint, etc.) and small fruits like strawberries and cherry tomatoes. These towers shine when space is limited – for example, on a balcony, patio, or sunny corner.
Pros: Extremely space-efficient – you can grow a large salad-worth of greens in a footprint under 2 square feet. Towers are also visually striking (a “living pillar”) and often come with built-in lights for year-round indoor use.
High production is possible: one 100-tower farm can be set on just a few hundred square feet and still yield thousands of plants every few weeks.

Cons: Height can be an issue. Indoor towers may be too tall for some rooms or ceilings. Because plants on the lower levels can be shaded by those above, most indoor towers include a vertical LED light (as seen above). Outdoors, towers need reliable sunshine. Also, towers usually don’t support large, root-heavy plants (no big fruit trees here). They work best with moderate-size varieties.
Popular Examples: The Tower Garden by Juice Plus+ is a well-known home aeroponic tower (popular among hobbyists). Other brands include Gardyn and Nutraponics, as well as DIY PVC pipe tower kits.
Towers excel when you want lots of salad greens or herbs from a small area. Imagine a dozen lettuce plants growing stacked up in one column – it’s a very efficient use of space.
Aeroponic Grow Boxes
Aeroponic grow boxes (also called grow cabinets) are self-contained indoor gardens. They look like small closets or mini refrigerators. Inside, you’ll find the water tank, pump, misters, and often built-in LED lights, fans, and even carbon filters.
Best For: Discreet indoor growing and beginners. If you want a hidden garden in your living room or bedroom, a grow box is ideal. It’s perfect for apartment growers, hobby gardeners, or anyone who wants an easy “plug-and-play” setup.
Pros: True all-in-one convenience. Boxes come with everything assembled: you just set them up, fill the tank, plug in, and plant the seeds. Because they are enclosed, they offer precise control of the environment.
You can adjust temperature, humidity, and light easily, and the grow box shields plants from light leaks and pests. Many boxes include carbon filters to keep any odor contained. They enable year-round, weather-proof gardening. New growers find them very beginner-friendly.
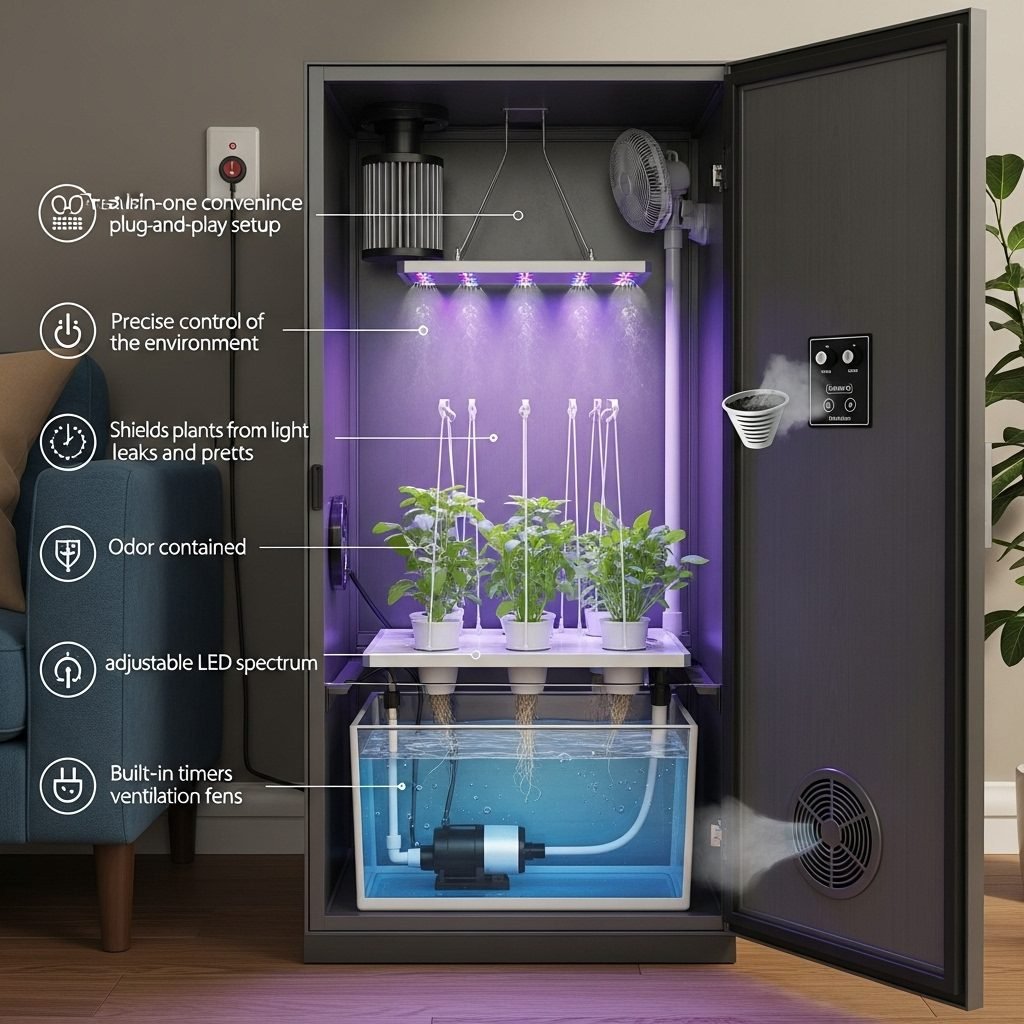
Cons: Space and cost. The internal grow area is limited (often only a few small plants or a couple of larger ones at a time). Large plants will crowd the cabinet. Also, high-quality grow boxes can be pricey (often $1,000 or more for a complete system). They are heavier and not portable.
Features to Look For: Check for units with adjustable LED spectrum (vegetative vs flowering modes), built-in timers, ventilation fans, and sturdy locks. Boxes often have safety features like auto-shutoff if the reservoir runs dry. Since they hide your plants, they are very stealthy and can have glass or solid doors for privacy.
Grow boxes are great if you want full environmental control. They let you mimic spring all year long in your closet. If your priority is an easy indoor garden (and you don’t mind the smaller size), a grow cabinet is a solid choice.
Aeroponic Grow Tents
A grow tent is essentially a sturdy fabric enclosure with a reflective interior. By itself, a tent is just an empty box (with support bars and vent ports). When sold as a kit, it’s a shell for you to install your own aeroponic system inside (tower, raft, or tabletop sprayer).
Best For: Serious hobbyists or those who want maximum control. Grow tents are for people who like to mix and match components. You can put a tower kit, NFT channels, or a homemade spray chamber in a tent. The tent’s reflective walls boost light efficiency, and the built-in vents and support bars allow you to easily hang lights, fans, and filters.
Pros: Highly customizable. You pick your own pump, nozzles, lights, and training system. This lets you tailor everything to your plants. Also, tents contain the environment well: they are lightproof and help maintain temperature and humidity. High-quality tents (like Gorilla Grow Tent) are sturdy (some can extend to 8–10 feet tall) and have thick, reflective fabric.
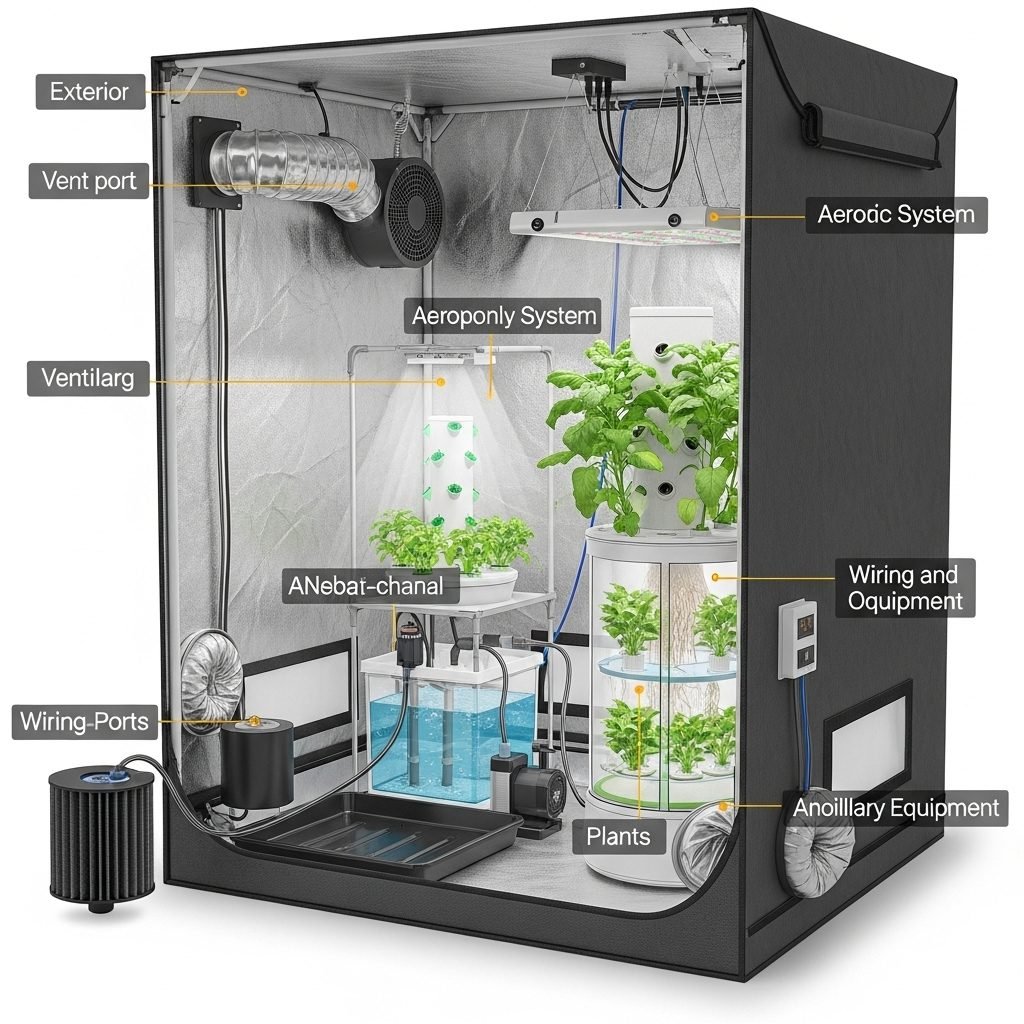
Cons: Kit completeness. Unlike boxes, you must source all parts yourself. A tent alone won’t come with the aeroponic equipment. You may need to buy a lighting kit, exhaust fan, carbon filter, pumps, and nutrient gear separately. This can add complexity and cost, and means more assembly. For beginners, building a tent/grow room setup can be daunting.
Typical Components: Grow tents usually require a light system (LED or HID), an inline exhaust fan (for ventilation), and ducting. Inside you install your chosen aeroponic system (tower or other). Common tent sizes for aeroponics are 2×2, 4×4, or 5×5 feet, depending on how many plants you want. Good tents have removable floor trays (for spills) and ports for wiring and hoses.
In short, grow tents give you flexibility. If you like tinkering and want a more “industrial” setup, a tent lets you combine the best parts. It’s popular among commercial growers or advanced hobbyists who run multiple grow systems in a single room.
Commercial & DIY Systems (Briefly)
Beyond home kits, there are larger-scale aeroponic systems and DIY projects. Commercial aeroponic farms use large towers, NFT (Nutrient Film Technique) tables, or hybrid designs in big greenhouses. At home, some growers build custom rigs from PVC pipes and high-pressure pumps.
These can offer even more control or scale, but they require technical skill. For most beginners, however, a ready-made tower, box, or tent kit provides an easier start.
Choosing the Right Aeroponic Kit for You
Choosing the right aeroponic grow kit depends on your goals, budget, and available space. With so many systems on the market, knowing what to look for helps you get the most out of your investment.
In 2025, the average home aeroponic kit costs between $150 to $800, depending on its size and automation level.
Your Space: Will you grow indoors or outdoors? Tower systems work well outside on a patio or balcony (they just need sunlight and an outlet). Indoors, think about height and floor space. Towers save floor area but need headroom. Grow boxes only need a closet-size nook. Tents come in set footprints (choose one that fits your room or basement). In general, aeroponics is ideal for small-footprint spaces because of vertical growing.
What You Want to Grow: If you mainly want salad greens and herbs, a compact tower or countertop kit is perfect. If you plan to grow fruiting crops (tomatoes, peppers, strawberries), choose a larger box or a tent setup with enough space and support. Some hobbyists even set up a tower in a tent to grow more demanding plants. Remember that most kits handle herbs and lettuce best.
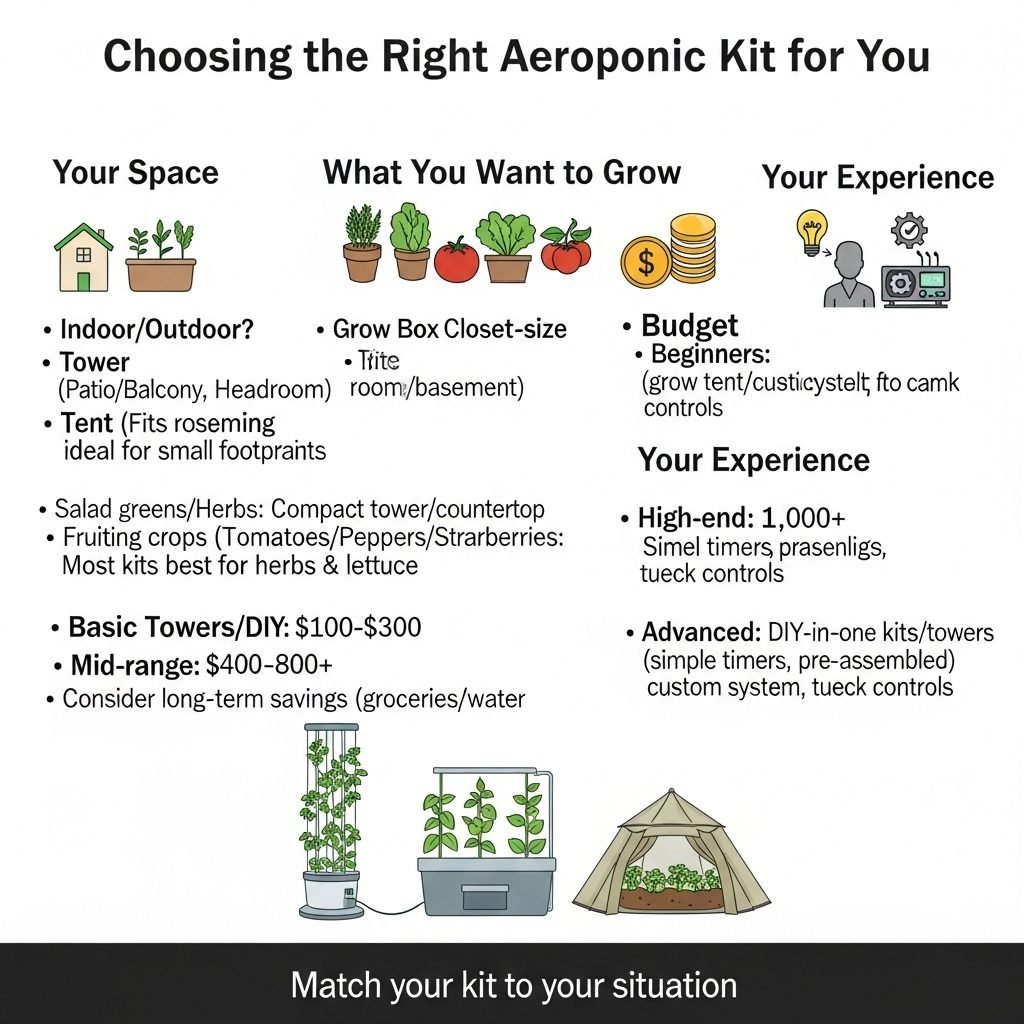
Budget: Basic towers or DIY kits can start around $100–$300. Mid-range full towers or starter boxes might run $400–$800. High-end systems (large cabinets or full tent setups with advanced controls) can cost $1,000+. Consider long-term savings too: you’ll save on groceries and water bills. A more expensive kit may pay off if it runs efficiently.
Your Experience: Beginners often do best with all-in-one kits or towers with simple timers. These kits come mostly assembled and include instructions. Commercial kit review: many Tower Garden users report being able to start fresh even as novices. On the other hand, if you’re an advanced hobbyist, you might enjoy the DIY flexibility of a grow tent or custom system. These let you tweak nutrient schedules and environmental controls (pH dosers, custom light cycles, etc.) once you know the basics.
In summary, match your kit to your situation. Small space + newbie = try a plug-and-play tower or box. Ample space + tech-savvy = a grow tent with professional lights. And remember: even the cheapest kit can help you learn aeroponics on a small scale before expanding.
Your First Aeroponic Grow Kit
By following these steps and keeping an eye on your kit, your plants will reward you with fast, lush growth. Many users find that within weeks, seedlings turn into full-size lettuce or herbs – a gratifying and rapid harvest compared to soil gardening.
i. Unbox and Assemble: Carefully unpack your system. Read the manual. Assemble the frame, insert the net cups (or tower sections), and secure the reservoir. Check that the pump and tubing are in place. Most kits include a simple diagram. Install any grow lights and hook up timers. Make sure all electrical parts are safely away from water.
ii. Prepare the Nutrient Solution: Fill the reservoir with water and mix in a hydroponic nutrient formula (available from garden stores). Follow the manufacturer’s instructions for dosage. It’s also a good idea to check the pH of the solution; most plants prefer slightly acidic water (around 5.5–6.5). Many kits come with a pH test kit. Adjust the pH with “pH Up/Down” solutions if needed. Proper nutrients and pH keep plants healthy.
iii. Plant Seeds or Seedlings: Use starter plugs or cubes (like rockwool or hemp) moistened with water or weak nutrient solution. Place one seed or a small seedling in each plug. Insert the plugs into the net cups or collars at the top of your system.
For leafy greens and herbs, sow seeds directly. Fast-growing plants like lettuce, spinach, basil, and cilantro work especially well. Avoid large or deep-rooted varieties at first. As seedlings sprout and roots grow into the misting chamber, you’ll see them thrive.

iv. Set the Misting Cycle: Program the timer for regular misting. A common schedule is a few seconds of mist every few minutes, but it depends on plant size and type. New seedlings need more frequent misting (e.g. 5 seconds on, 2 minutes off) to stay moist. As plants grow larger, you can extend the off-time.
The goal is to keep roots wet without flooding them. (If your kit has a recommended setting, start with that.) If you see plants wilting, adjust to shorter off times. Proper timing is critical; many growers note that pump cycle control is the most important factor for success.
Table: Starting your first aeroponic grow kit
| Step | Task | Goal | Time Required |
|---|---|---|---|
| 1 | Assemble the kit | Ensure proper structure | 1–2 hours |
| 2 | Mix nutrients | Prepare clean solution | 15 minutes |
| 3 | Set timer cycle | Optimize misting | 5 minutes |
v. Maintain and Monitor: Check your system daily. Top up the reservoir with water-nutrient mix whenever it drops (plants will quickly use the solution). Add nutrient mix as needed to replace what plants take up. Keep a log of how often you refill.
vi. Check pH and EC: Test the solution’s pH daily or every few days. Most plants like 5.5–6.5. Measure electrical conductivity (EC) or total dissolved solids to gauge nutrient strength. Adjust by diluting or adding nutrients so the plants aren’t underfed or overfed.
vii. Clean Weekly: Every week or two, empty out and rinse the reservoir. Clean the pump and tubes. Aeroponic nozzles can clog over time from mineral build-up. If mist becomes uneven, soak the nozzles in white vinegar and scrub lightly. Keep things sterile. Cleaning prevents root diseases and ensures good misting.
viii. Watch the Plants: Prune overcrowded growth so all leaves get light. If you notice yellowing or stunted growth, check that your nutrient solution is fresh and balanced. Many beginners find that pH drifting or nozzle clogs are common fixes.
Conclusion
Aeroponic gardening offers a fast, efficient way to grow fresh produce with less water and space than ever before. To recap: Tower systems are perfect for maxing out small outdoor or patio areas with herbs and salad greens; grow boxes provide a fully controlled mini-greenhouse indoors; and grow tents let you mix and match equipment for custom setups. Whichever path you choose, starting with a complete kit takes much of the guesswork out of soilless gardening.