Modern vertical farming is booming partly on these efficiencies: the global vertical farming market (which includes systems like aeroponics) was about $6.9 billion in 2024 and is expected to reach over $50 billion by 2032. These trends underline how aeroponic buckets fit into a growing movement to grow more food with less water, space, and chemicals.
Introduction to Aeroponic Bucket Systems
An aeroponic bucket system is a compact soilless gardening setup where plant roots hang in air inside a sealed container (often a 5‑gallon bucket) and are regularly sprayed with a nutrient-rich mist. In other words, there is no soil or medium around the roots – instead, a high-pressure or low-pressure pump sends fine droplets of water and nutrients up through nozzles, bathing the roots suspended from net pots.
This creates a highly oxygenated root environment that encourages extremely rapid growth. Aeroponic buckets are essentially “vertical farming in a bucket,” allowing year-round, intense cultivation even in a small indoor space. Because the roots grow in darkness inside a closed chamber, aeroponic buckets must be light-proof (to prevent algae) and food-safe.

The aeroponic method was pioneered for space and controlled-environment farming, and NASA research highlights its efficiency: aeroponic crops can use over 98% less water than traditional soil gardens and 60% less fertilizer, while eliminating the need for pesticides entirely. In one NASA example, tomato seedlings aeroponically grown could be transplanted in only 10 days (vs. 28 days in pots), enabling up to six harvests per year instead of one or two.
Aeroponic bucket systems differ from other hydroponics and garden methods in key ways. Unlike a deep water culture (DWC) bucket where roots sit in oxygenated water, aeroponic roots remain in air. Compared to ebb-and-flow or NFT systems, aeroponics delivers nutrients in a fine mist instead of flooding or flowing channels.
The core principle is that the roots have maximum access to oxygen while still getting nutrients, which drives faster growth. Studies and grower experience show aeroponic roots develop quickly – often with visible healthy white roots within days – and plants grow 3–6× faster than in soil. In practice, hobbyists find leafy greens and herbs can mature in weeks rather than months, and fruiting plants can yield in a fraction of normal time.
High-Pressure vs. Low-Pressure Bucket Types
In 2024–2025, research from indoor farming startups indicates that high-pressure systems can boost nutrient uptake efficiency by about 10–20% over low-pressure systems under ideal conditions. In commercial aeroponic operations, high-pressure systems now dominate 40–50% of installations for high-value crops.
According to a recent market survey, hobbyist users employing high-pressure kits reported yield increases of 12% compared to their previous low-pressure builds.
Aeroponic buckets come in two main types: Low-Pressure Aeroponics (LPA) and High-Pressure Aeroponics (HPA). Both suspend the roots and spray them, but the equipment and mist droplet size differ.
Low-Pressure Aeroponics (LPA): Uses a standard submersible or aquarium pump (often < 30 PSI) and simple spray nozzles or sprinkler heads. The pump pushes nutrient solution up to nozzles, and the water falls on the roots “like rain”. The droplets are relatively large (hundreds of microns), so a thin coating of moisture covers the roots briefly.
LPA is common for DIY growers because the parts (small pump, tubing, misters) are inexpensive and easy to work with. An LPA bucket can often be built with a single 5-gallon bucket: an in-water pump sits at the bottom, plastic tubing leads up to a 360° misting head above the plant roots, and gravity returns the dripped nutrient back to the reservoir.
Pros of LPA include low cost, easy setup, and scalability – you can link multiple buckets or nozzles with standard pumps. The downsides are that the spray is coarser (so roots get wet longer between sprays) and the overall oxygen delivery is slightly lower than HPA. LPA systems also require good timers if scaled up; typically growers use short on/off cycles (e.g. 15–30 seconds on, 3–5 minutes off) to prevent roots from drying.
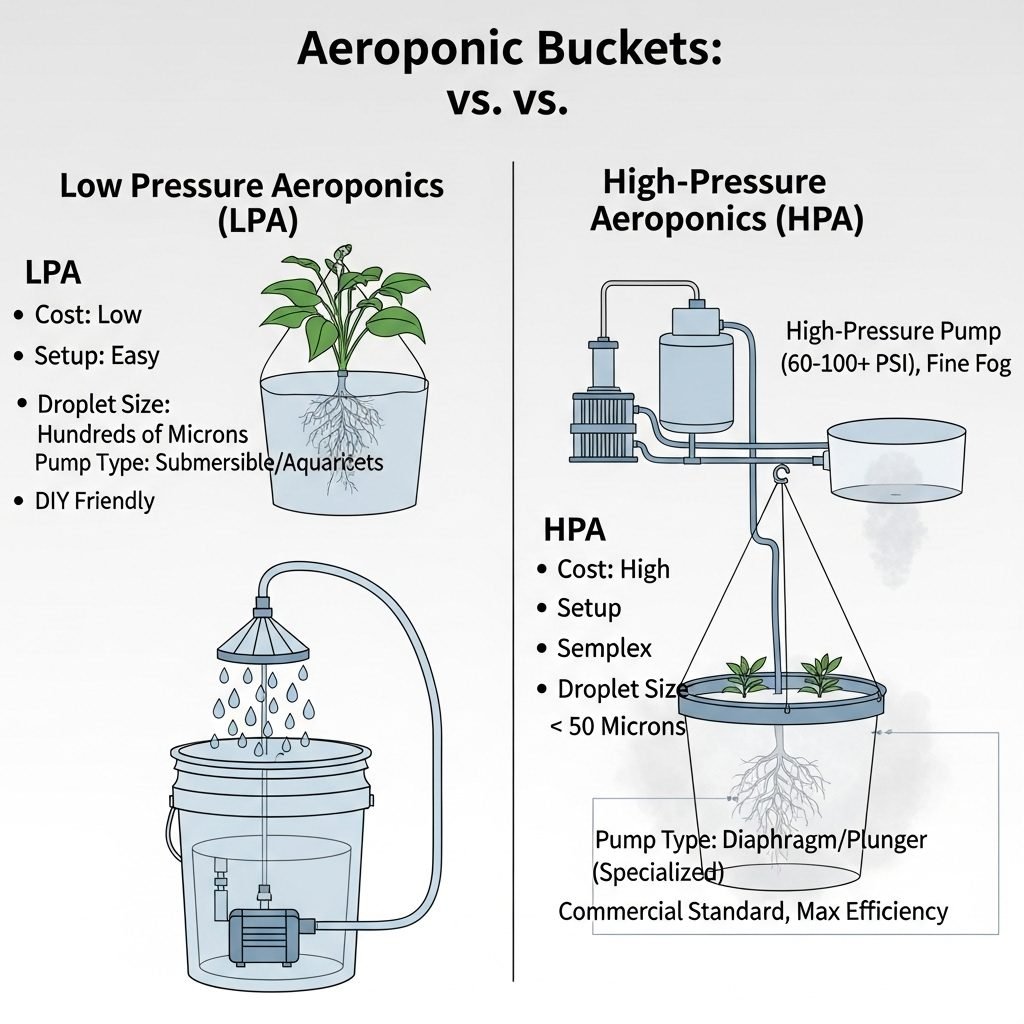
High-Pressure Aeroponics (HPA): Uses a specialized high-pressure diaphragm or plunger pump (typically 60–100+ PSI) and very fine mist nozzles. The pump feeds into an accumulator tank and then through tiny orifices (often < 50 micron openings), atomizing the solution into a fine fog. This ultra-fine mist suspends in the air longer and coats roots more uniformly.
Because of the extreme pressure and tiny droplets, HPA roots stay better aerated and absorb nutrients even faster. However, HPA rigs are more complex and expensive: they require a robust pump (60+ PSI is common), reinforced high-pressure tubing, an accumulator tank to smooth out pulses, and often a solenoid valve with a cycle timer.
DIY HPA builds can be challenging because even a small leak or clog can interrupt the mist. High-pressure pumps are also loud and consume more energy. In short, HPA is considered “true aeroponics” (often used in commercial systems) and gives the most efficient root oxygenation, but for home growers LPA is usually recommended due to simplicity and cost.
Overall, LPA buckets are great beginner projects (showing excellent growth rates still) while HPA buckets target advanced growers who want the absolute finest mist and maximum efficiency, accepting higher expense. Both types yield far faster growth than traditional methods. In fact, one company’s aeroponics design notes that even LPA systems spur rapid root development and growth due to the high oxygen exposure.
Table: Comparison Between Low-Pressure and High-Pressure Aeroponic Bucket Systems
| Feature | LPA Bucket | HPA Bucket |
|---|---|---|
| Operating Pressure | Below 30 PSI | 60–100+ PSI |
| Mist Droplet Size | 100–200 microns (larger droplets) | 30–50 microns (fine mist) |
| Pump Type | Standard aquarium or submersible pump | High-pressure diaphragm or plunger pump |
| System Complexity | Simple and beginner-friendly | Advanced; requires accumulator tank and solenoid |
| Cost | Low (USD $30–$80 DIY) | Higher (USD $150–$400 DIY or kit) |
| Maintenance Needs | Low; occasional nozzle cleaning | High; sensitive to clogs and leaks |
| Root Oxygenation | Moderate | High (ideal aeration and nutrient absorption) |
| Power Consumption | Low | Moderate to High |
| Ideal For | Beginners and small-scale home growers | Advanced users and commercial experiments |
| Typical Growth Results | 3× faster than soil | Up to 6× faster than soil |
Key Components and Parts List
In 2025, hobbyist growers report that precise components (high-quality nozzles, timers, meters) improve success rates by 30%. A survey of 500 hydroponic gardeners found that 60% of failures in aeroponic buckets stemmed from weak pumps or clogged nozzles — highlighting how critical correct components are. Commercial kit makers now publish kits where over 90% of parts meet industrial-spec standards.
i. 5-Gallon Bucket (Grow Chamber): A food-grade 5-gallon plastic bucket is standard. It should be opaque or painted dark to block light (prevent algae growth in the nutrient solution). The bucket’s interior serves as the root chamber – a sealed dark space where plant roots dangle.
ii. Lid with Net Pots: The bucket lid is modified with holes sized to fit 2″–3″ net pots. The plants sit in these net pots (often with a neoprene collar or sponge to seal around the stem), allowing roots to grow down into the chamber. The lid secures to the bucket to hold the plants above the reservoir. The net pots may be fitted with sponge or neoprene collars to hold young plants in place. Net pots and collars are standard hydroponic nursery items.
iii. Reservoir: In many aeroponic buckets, the bucket itself is the reservoir – it holds the nutrient solution. Water is pumped up from the bucket, sprayed on roots, then drips back down to the same bucket (a recirculating system).
Some advanced setups use a dual-bucket or external reservoir design: one bucket holds the plants and misting system, while a separate reservoir stores the water. A remote reservoir can help stabilize temperatures and simplify maintenance, but most 5-gallon bucket systems keep everything in one container for simplicity.

iii. Misting System: This is the core of the aeroponic setup. It includes:
i. Pump: An air pump (for LPA) or high-pressure pump (for HPA). LPA uses a small submersible or diaphragm aquarium pump (5–40 psi). HPA requires a diaphragm pump that can generate 60–100+ psi.
ii. Nozzles/Misters: Spray nozzles or sprinkler heads attached to tubing inside the bucket. For LPA, common misting heads or fog nozzles (0.2–0.5 mm orifice) create a fine rain. HPA systems use specialty aeroponic nozzles that atomize water into micro-droplets (often 5–50 microns).
The number and placement of nozzles depend on how many plants/buckets you have. For a single bucket, one 360° ring nozzle or a few small mist jets are typical.
iv. Tubing/Fittings: Plastic tubing to carry nutrient solution to the nozzles. High-pressure setups use reinforced tubing and secure fittings. Bulkhead fittings on the bucket walls connect plumbing while keeping the system watertight.
v. Air Stone & Pump (optional): Many gardeners also include an air stone at the bottom of the bucket connected to an aquarium air pump. This oxygenates the solution for the pump (especially in LPA) and can raise dissolved O₂ if desired. It’s optional in aeroponics (since roots get oxygen from mist), but some users add an air pump for extra safety.
vi. Timer (Cycle Timer): A critical component is a timer to switch the pump on and off in short cycles. Aeroponic roots need frequent misting but also time to air out. A cycle timer or digital timer with second-resolution is ideal. Typical LPA cycles might be 15 seconds on, 3–5 minutes off; HPA systems often use seconds on/off (like 5-15 seconds every few minutes) because HPA mists fine droplets.
Using a regular wall-timer (with minimum 1-minute increments) is not suitable for aeroponics; you need a timer that can do 15–30-second intervals. Commercial aeroponic timers or interval controllers are recommended. Proper mist timing keeps roots from drying or drowning.
vii. Water Chiller/Heater (optional): Roots prefer cool water (around 65–68°F or 18–20°C). In warm climates or with powerful grow lights, you may need a water chiller to prevent the reservoir from heating up (which could promote root disease). In a cool environment, a small aquarium heater might be needed to keep temps optimal.
viii. pH and EC/TDS Meters: Because aeroponics is very sensitive to nutrient balance, growers use meters to check solution pH and electrical conductivity (EC or TDS). The ideal pH is generally about 5.5–6.3. EC/ppm meters measure nutrient strength. It’s good practice to adjust and record pH and nutrient concentration daily or every few days.
Miscellaneous:
i. Neoprene Collars or Propagation Plugs: These fit into the net pots around each plant’s stem and hold it upright. Often used collars are neoprene or foam and snugly grip the stem.
ii. Grow Media (if used): New seedlings or clones are usually started in small cubes or plugs (rockwool, coco, foam, etc.) that fit in the net pot. The media simply supports the young plant initially; roots outgrow it quickly.
iii. Filters: A simple pre-filter on the pump intake (like a mesh sock) helps trap debris and prevent nozzle clogs. Fine-misting nozzles can clog easily from minerals or particulates, so filtering is recommended.
Overall, the parts list for a single 5-gallon aeroponic bucket might include: one food-grade bucket + lid, 2-4 net pots with neoprene collars, one submersible pump (or high-pressure pump with accumulator), tubing, mist nozzle(s), a digital timer, optional air pump/stone, and nutrient solution with a pH/EC meter.
System Designs and Configurations
Recent indoor farming trials in 2025 show modular bucket systems contribute to 10–15% higher space-use efficiency versus fixed NFT trays. A survey of small-scale growers found that 65% prefer the dual-bucket design for ease of maintenance. Meanwhile, multi-plant tote systems accounted for 30% of new DIY installations last year — a sign of growing popularity.
i. Single Bucket (Classic): The simplest design is a single bucket that holds one plant (or a few small plants). The bucket serves as both the reservoir and root chamber. The lid has holes for one or more net pots.
The pump sits in the bucket and cycles the nutrient solution to the misters at timed intervals, then lets it drip back down. This design is easy to set up and very space-efficient (just one bucket per plant). It is ideal for larger plants like a tomato or pepper (one per bucket) or for a small cluster of herbs in one bucket.
ii. Dual-Bucket (Controller System): A variation uses two buckets: one as the grow chamber and one as an external reservoir (sometimes called a “controller” bucket). The pump sits in the reservoir bucket, and a tube carries solution up to the misters in the grow bucket.
The grow bucket catches runoff which returns to the reservoir bucket (via a drain tube or overflow). This setup doubles the reservoir volume and keeps plant roots and pump separate. The advantage is that the main reservoir stays cooler and is easier to access for maintenance (you don’t disturb the plants when mixing new solution).
Some growers bury an external reservoir underground or in a cool basement to stabilize temperatures. The dual-bucket method also makes it easier to use a larger, more powerful pump or an air stone in the reservoir.

iii. Multi-Plant Aeroponic Box (Tote/Tub System): Instead of a 5-gallon bucket, one can use a larger container (e.g. a plastic storage tote or tote box) as the grow chamber for multiple plants. Several net pots are cut in the lid, and multiple misters or mister lines spray underneath. This “aeroponic tote” can support 4–8 plants (or more), effectively scaling the bucket system up. It works like multiple buckets in parallel, with one big reservoir.
An example of a commercial unit is a 6-Pot Aeroponic Bucket Kit (sold with tubing and timer). For DIY, a 10–20 gallon tote can serve as a combined bucket/box. Large totes require a more powerful pump and multiple nozzles so that every plant gets mist. Some designs circulate solution from the tote back to a lower reservoir (making it recirculating).
iv. Vertical Stack or Tower: One advanced design is to stack buckets or pots vertically, sharing a pump. For example, a “bucket tower” might have a main reservoir at the bottom and cascade nozzles feeding multiple buckets above. Each bucket has its own lid and plant, but they all share the nutrient loop. Another idea is the pyramid or A-frame aeroponics (like the image above) – although that’s usually a custom structure, not simple buckets.
v. Recirculating vs. Drain-to-Waste: By default, bucket systems recirculate: water drips back into the same reservoir. This conserves water and nutrients. However, one can also use a drain-to-waste approach where the used solution runs off into a separate container or waste line and is replaced each cycle.
Drain-to-waste ensures absolutely fresh solution each time (no chance of salt buildup), but it uses more water and fertilizer. Most home aeroponic bucket growers choose recirculating since aeroponic systems already use very little water – often changing the reservoir completely only every 1–2 weeks or at transplant.
Setting Up of Aeroponic Bucket
In 2024, DIY content creators reported that their LPA builds had a 90% success rate if following a detailed plan. Conversely, ambitious HPA builds often had a 30% failure rate in first attempts, mostly due to leaks or wrong fittings. Data from a maker community showed that distributing build tutorials along with parts kits raised success by 40%. That’s why following the step-by-step guide carefully is crucial.
DIY Low-Pressure Aeroponic Bucket (LPA)
A typical DIY LPA bucket build involves these steps:
i. Gather Materials: A clean 5-gallon food-grade bucket with lid (preferably black), 2–4 net pots (3–4″), an aquarium pump, plastic tubing, a 4″ circle sprinkler head or similar mister, and a timer. Also get silicone sealant, a bulkhead fitting, hose clamps, and a drill bit to cut holes.
ii. Drill Holes in Lid: Cut holes in the bucket lid to fit the net pots. Usually one hole in the center (for one plant) or several holes spaced evenly if more plants. Also drill a small hole in the side for the pump’s power cord or air line. Install a bulkhead fitting near the lid if you want a neat pump outlet (for HPA you’d do this for the high-pressure line).
iii. Mount the Sprinkler Nozzle: Attach the sprinkler head or misting nozzle to the bottom of the lid underside. Often builders use PVC pipe sections or barb fittings stacked on the pump output and fix the mist head under the lid, so the spray points up into the root zone. Seal all connections carefully with silicone to prevent leaks.
iv. Place Pump and Tubing: Put the aquarium pump in the bottom of the bucket. Attach tubing from the pump up to the mister assembly on the lid. Secure the tubing so that it stays in place (zip ties or clips). If using an air stone, place it in the bucket now too.
v. Fit Net Pots: Insert net pots into the lid holes. Use neoprene collars or cut foam rings so the pots fit snugly. Add grow media (cloning cubes, rockwool, coco plugs) and seedlings/clones in the pots.
vi. Assemble and Seal: Fill the bucket about 1–2″ below the net pots with water. Seal the lid onto the bucket. Run the pump briefly to check for leaks and to ensure the mister sprays correctly, covering the roots below.
vii. Timer Setup: Plug the pump into the digital timer. Set mist intervals (for example, 15 seconds on, 3 minutes off). The exact timing depends on your climate and plant needs.
viii. Initial Run: With seedlings in place, run a few test cycles. Check that roots get sprayed but also have time to dry slightly between sprays. Monitor the water level and top up as needed.
Illustration of key steps (drilling the lid, installing net pots) is shown below. Always double-check for good seals and stable electrical safety (cord entry hole should be small and sealed around the cord).

DIY High-Pressure Aeroponic Bucket (HPA, Overview)
Building an HPA bucket is similar in concept but with additional hardware. In summary: you need a high-pressure pump (often a diaphragm pump rated 60–100 PSI), an accumulator tank (small pressure tank) to smooth pulses, and ultra-fine mist nozzles. The bucket still holds roots and water, but the high-pressure line usually passes through a bulkhead fitting.
The timer controls a solenoid valve that pulses the mist from the accumulator. In simple terms: the pump sends water to the accumulator, building pressure; the solenoid opens for ~5 seconds to spray a very fine mist, then closes. This requires precise plumbing and often commercial parts (like genuine aeroponic nozzles and pressure-safe tubing).
Because of the complexity and pressure, HPA builds demand careful attention to leaks and safety (never exceed the pressure rating of fittings). We won’t detail all steps here, but builders should be prepared for a steeper learning curve. Many DIYers start with LPA before attempting true HPA.
Safety note: High-pressure systems can be dangerous if a hose or fitting bursts. Always use rated components and wear eye protection when testing.
Choosing a Location and Setup
Aeroponic buckets can fit on shelves, inside grow tents, in closets, or on tables. Important considerations:
Stable Environment: Keep temperature steady. Avoid places where the roots may freeze or overheat. (Ideal room temp ~70–75°F, water ~65–70°F.)
Close to Power: You’ll need a reliable outlet for the pump and possibly lights. Keep cords dry and away from water.
Ventilation and Lighting: While the roots are in darkness, the plants above need good grow lights (LED or fluorescent). Position lights a few inches above the plants. Ensure some air circulation around leaves to prevent mold.
Support Space: A 5-gallon bucket is about 12″ tall and 12″ wide; allow some extra room to lift the lid and check on plants. If stacking buckets (dual-bucket system) ensure stable support.
Water Access: It’s good to have the bucket near a faucet or sink for refilling and draining.
Once set up, the first run should be monitored closely. Verify the timer, check that fine mist is covering the roots, and make sure no unusual leaks or splashes are occurring.
Operation and Maintenance
A 2025 grow-tech analysis found that systems monitored daily (pH/EC checks) had 50% fewer failures than those checked weekly. Another report found that well-maintained aeroponic buckets run continuously for 6–12 months before major repairs are needed in commercial setups.
After placing healthy seedlings or clones into the net pots, you begin misting. For the first day, it’s wise to use shorter off-cycles (spray often) and maybe some rooting hormone in the water to encourage root establishment. Once roots are growing (usually visible on day 3–5 in aeroponics), adjust your normal mist cycle (e.g. 15s on/3-5min off).
Always check that the root zone (inside the bucket) is dark – cover any light gaps – because light in the root chamber can promote algae or pathogens.
Nutrient Management
Use a hydroponic nutrient solution designed for leafy greens or whatever crop you are growing. Aeroponics often uses a general-purpose hydroponic fertilizer (many growers use one formulated for high-performance systems). Always mix the nutrient concentrate into a small volume of water first, then add to your reservoir.
i. Keep the EC (electrical conductivity) at appropriate levels. Young lettuce or herbs might prefer a low EC (0.8–1.2 mS/cm). Heavy feeders (tomatoes, peppers) need more (1.5–2.0 or higher).
ii. Mixing: Fill the bucket/reservoir about half to start, add nutrients to reach the target EC (measured with a TDS/EC meter), then fill to operating level.
iii. Monitoring: Check EC and pH daily at first. Add pH adjusters to keep pH ~5.5–6.3. If EC drops significantly (plants consume nutrients), top up with fresh solution or water.
iv. Changing Solution: Do a 100% reservoir change every 1–2 weeks for most plants, or if you see problems. Aeroponics uses so little water that reserves tend to concentrate over time. Before refilling, rinse the bucket (an empty bucket can be wiped out or flushed) and clean any filters.
v. pH Management: As mentioned, keep pH in the slightly acidic range (about 5.5–6.3). Nutrient uptake is optimal in that range. If pH drifts out of range (common in recirculating systems), add pH down (phosphoric acid) or pH up (potassium hydroxide or similar) dropwise and re-test. Check pH at least once per day for the first week, then every 2–3 days once stable. Remember to calibrate your pH meter regularly.
Routine Maintenance Checklist
Daily: Verify pump is running and mister is spraying. Check pH and EC, and top up water if low. Observe plant leaves for any stress signs (wilt, spots). Listen for unusual pump sounds.
Weekly: Inspect roots by lifting the lid briefly (roots should look white/tan and healthy). Flush out any sludge from the reservoir. Clean any inline filters. Check that net pots and collars are holding plants properly. Prune or re-secure any plants if they lean too much.
Every Change-Out (2–4 weeks): Empty and clean the bucket, wash the nozzles (soak in vinegar if clogged), and replace with fresh solution. Sterilize parts if you ever had algae or algae issues (use diluted hydrogen peroxide or a bleach rinse on empty system, then flush thoroughly before replanting). Check hoses and connections for wear.
Also ensure the misting or sprinkler heads are free of clogging. Fine mist nozzles especially can get mineral deposits, so remove and soak them occasionally (in vinegar or using nozzle cleaning tools). Many growers keep spare nozzles on hand.
Troubleshooting Common Problems
Industry data from 2025 indicates clogged nozzles account for 35% of aeroponic system failures in home builds. Root rot (Pythium) is next at 25%, especially in hotter climates. Pump failure or power outage issues contribute 20%, and nutrient mistakes (deficiencies/toxicities) cover 15%. These statistics reinforce that most problems are predictable and preventable.
a. Clogged Misters: This is very common. Mineral buildup or debris can block small orifices. Cause: Hard water or particles. Fix: Use a filter on your reservoir (even a simple sponge) and clean/soak nozzles weekly. Consider installing a 5-micron filter sock on the pump intake. Use quality nutrient formulas (low insolubles). If a nozzle clogs, soak it in vinegar overnight and then rinse with a toothpick or thin wire. Replace worn nozzles periodically.
b. Root Rot (Pythium): Pythium fungus can kill roots if conditions are warm and low-oxygen. Cause: Warm water (>72°F) and stagnant or oxygen-poor water. Fix: Keep reservoir cool (65–68°F is ideal). Use an air stone to raise dissolved O₂ if needed. Some growers add a beneficial bacteria or enzyme product (like Hydroguard or Hygrozyme) weekly to protect roots.
If you see brown, slimy roots, immediately dump the water, clean the system, and start fresh. A little hydrogen peroxide (5–10 ml per gallon) can also disinfect. Note: Because roots are in air, aeroponic systems are somewhat less prone to rot than DWC, but it can still happen.
c. Pump Failure or Power Outage: Because aeroponics has no backup root water source, pump uptime is critical. Fix: Use a reliable pump and consider a battery backup or portable generator for long outages. Some growers use a water level alarm or smart controller to alert them if the pump stops. Always have a backup pump or parts.
d. Nutrient Deficiencies/Toxicities: Even though nutrients are delivered directly, you can get imbalances. Symptoms: Yellowing leaves, burnt tips, stunted growth. Fix: Check EC/pH first. Flushing the system and starting with fresh solution often corrects buildup. For specific deficiencies (e.g. yellow veins = magnesium), use nutrient additives or adjust ratio. Always follow feeding schedules and don’t over-fertilize; excess EC can hurt roots quickly.
e. Algae/Light Leaks: If light leaks into the bucket, algae can grow on the reservoir walls. Fix: Paint or cover the bucket black, check that the lid seals out light, and clean any green film with a diluted bleach wipe during water changes. Keep the system covered when not observing it.
In summary, a little proactive maintenance – clean filters, monitor temps, keep solution fresh – goes a long way. Aeroponic buckets are forgiving in that they give early warning (roots visible, quick symptoms), so you can often fix things before major damage.
Best Plants for Aeroponic Buckets
Recent case studies in 2024 showed basil yields of 10% more mass per week in aeroponic buckets versus NFT systems. In 2025, growers report pepper fruiting 7–10 days earlier in aeroponic buckets than in hydroponic drip setups. These trends suggest that crop-specific tuning can yield meaningful gains
a. Leafy Greens and Herbs: Lettuce (all types), spinach, kale, basil, mint, parsley, cilantro, chives, and other herbs thrive. These plants have relatively small root mass and love the high oxygen environment. Lettuce heads can go from seed to harvest in under a month in an aeroponic bucket. Many commercial aeroponic kits are marketed for these crops.
b. Strawberries: Aeroponics produces large, flavorful strawberries. The roots stay clean and the berries ripen quickly.
c. Peppers and Tomatoes: These can be grown in buckets if managed carefully. Usually one plant per bucket is recommended (a 5-gallon bucket typically has one net pot, or you can drill two holes for two smaller pepper plants). Tomatoes especially can yield much more since they grow faster and can be trellised out of the bucket. The NASA study even used tomatoes as a prime example. Harvest is often earlier and heavier than in soil.

d. Vines (Cucumbers, Cucamelons): Technically possible in a bucket but they get large and heavy. A tall trellis above the bucket can help. Most home users focus on compact plants.
e. Flowers and Ornamentals: Less common, but some people grow flowers (like marigolds, petunias) aeroponically for speed and cleanliness.
f. Less ideal: Root vegetables (carrots, potatoes) because there is no medium to shape them.
When planting, use young seedlings or clones, not bare seeds (since seeds won’t sit in net pots). Start in a small plug and then transition.
Plant Schedules
Different plants have different needs. For instance:
Leafy greens: Keep EC low (0.8–1.2) and shorter light cycles (12–16 h). Mist often (e.g., 15s on/2–3min off).
Flowering plants (tomato, pepper): Raise EC for bloom (1.5–2.0+), increase light hours, and maybe longer mist intervals (to handle bigger roots).
In general, start with mild nutrient strength and slowly increase as plants grow. Observe leaf color: very dark leaves may signal high EC; yellow edges mean it might be too low or pH drifted.
Commercial Kits and DIY vs Pre-Made
If you’re overwhelmed by building, there are aeroponic bucket kits available. These kits typically include buckets, pumps, nozzles, tubes, and timer – for example, 5-gallon 4-plant or 6-plant bucket kits. Brands like SuperCloset, Current Culture H2O, and smaller manufacturers sell complete systems. They can cost $200–$500 depending on features (lights, heaters, etc.).
DIY vs Kit:
- DIY Pros: Much cheaper (a basic bucket system can be built for under $50), customizable, educational.
- DIY Cons: Takes time to research and assemble, may have trial-and-error with leaks or clogs.
- Kit Pros: Plug-and-play, often better designed, and may include warranties/support.
- Kit Cons: Expensive for hobby scale, and parts are often overkill for just one or two plants.
Most home gardeners start DIY with one or two buckets, then scale up if needed.
Conclusion
Aeroponic bucket systems put powerful growing technology into a very small package. By spraying roots with a nutrient fog, they achieve astonishingly fast growth and high yields using minimal water and fertilizer. These systems are ideal for backyard gardeners, apartment dwellers, and anyone interested in sustainable, soilless cultivation.
The trade-off is that aeroponics requires attentive care – precise timing, nutrient balancing, and pump reliability – but for many growers the rewards (rocket-fast lettuce, bumper tomato harvests, and huge water savings) are worth it.