Aeroponic seedlings are young plants germinated in a soil-free environment where their roots dangle in the air and are periodically misted with a nutrient-rich solution. Unlike traditional soil or even standard hydroponic methods, aeroponics suspends the root system directly in a misting chamber. Pumps, spray nozzles, and timers deliver a fine spray of nutrients, giving roots 100% oxygen exposure.
This unique setup drives faster germination and explosive early growth. In fact, studies note that aeroponic roots and shoots can grow dramatically quicker and larger than their soil-grown counterparts. As a result, aeroponics is often touted as the ultimate seed-starting method – producing healthier transplants with vigorous root systems in less time.
Introduction: Future of Seed Starting
In traditional gardening, seeds are sown in soil, peat pots, or other solid media. By contrast, aeroponic seed starters keep the growing medium minimal (often just a plug or collar) and expose roots to an air/mist environment.
The system consists of a water reservoir, a pump, misting nozzles, and a timer. The pump sprays fine droplets of nutrient solution onto the suspended roots at set intervals. Because the roots are never submerged and are kept aerated, they absorb oxygen more efficiently. This leads to faster nutrient uptake and rapid, uniform growth.
The core concept is simple: aeroponics grows plants in a highly oxygenated atmosphere without soil. By misting the roots instead of dunking them in water or growing them in earth, aeroponics dramatically speeds up germination and root development. In other words, it “rains” nutrients on the roots while they hang in clean air.
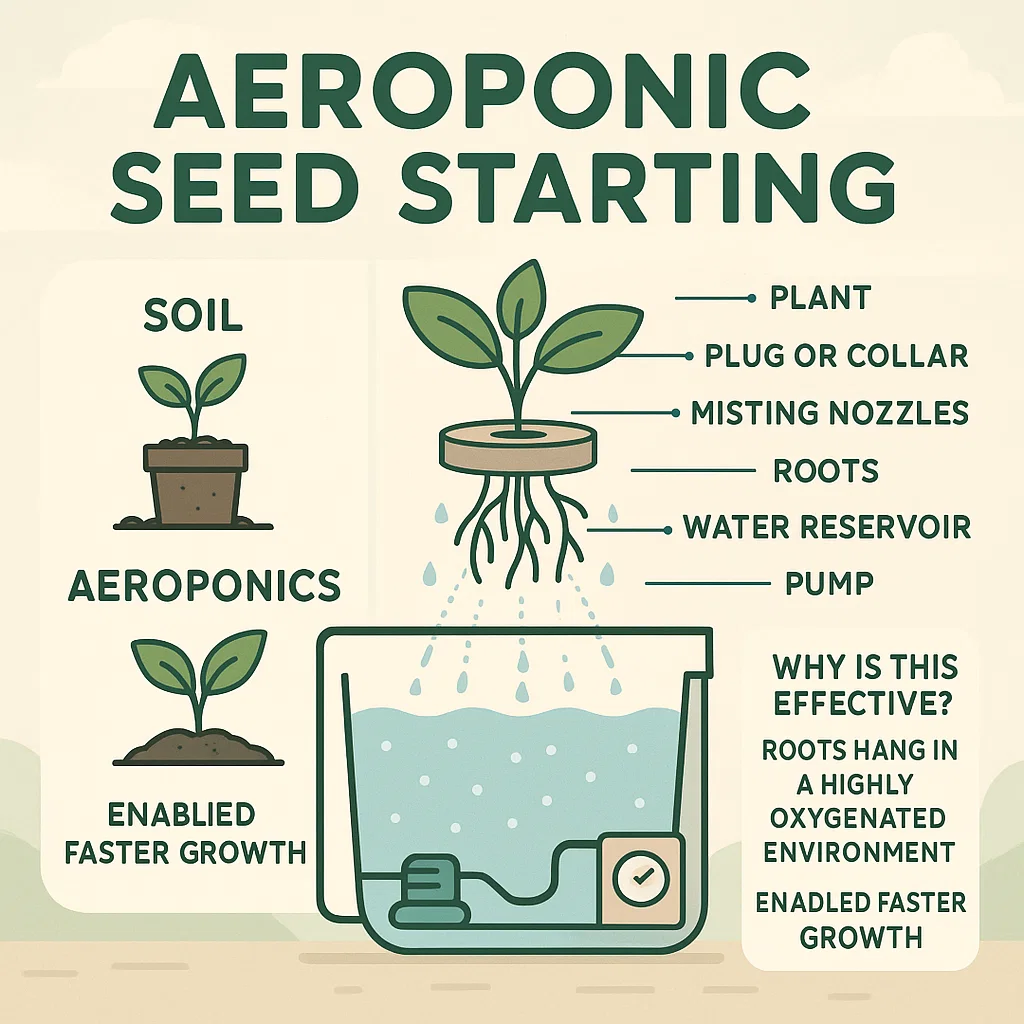
Why is this so effective? Since roots are not surrounded by soil or even standing water, there is no resistance to root growth. Roots can expand unimpeded, drawing in oxygen at every moment. In effect, they enjoy 100% oxygen availability.
Studies have shown that aeroponic plants develop far more root mass and overall growth.
For example, one study of cannabis growth found aeroponic plants produced 64 times more root biomass and nearly double the height of soil-grown plants after just 8 weeks. Although that is a specific case, it highlights the power of mist-based root zones.
Ultimately, aeroponics delivers faster, more vigorous seedlings. Gardeners often note seedlings started this way germinate sooner, grow greener leaves, and establish stronger taproots. Many seed-starting experts now view aeroponics as a high-tech way to “get a head start” on the growing season.
How Aeroponic Seed Starting Works
As of 2025, innovations in automation and sensor technology have made aeroponic seed starters more efficient and affordable. Many systems now include smart timers, LED integration, and self-cleaning nozzles, allowing both hobbyists and commercial growers to manage seedlings with ease. The basic operation remains the same — using air, mist, and nutrients to power early plant growth.
Basic System Components
An aeroponic seed starter system has several essential parts that work together to mist the plant roots:
- Reservoir: Holds the nutrient solution.
- Pump & Misting Nozzles: The heart of the system, creating a fine fog or mist that coats the roots.
- Enclosed Growing Chamber: Keeps humidity stable while shielding roots from light.
- Net Pots & Collars: Support the seeds and young seedlings at the top.
- Timer: Controls the misting intervals for precision watering.
The Seed Starting Process
Starting seeds in an aeroponic system usually follows these steps:
Germinate in a Plug: First, seeds are sown in a pre-soaked seed plug or cube (rockwool, coco plug, peat pellet, etc.) under warm, humid conditions. This can be done outside the system (e.g. in a tray with a humidity dome) or directly in the aeroponic unit if it has a germination mode. The plug retains moisture and gives the seed a stable start. Once tiny roots emerge (usually in a few days for many veggies), the seedling is ready.
Transplant to the System: Place the plug with the young seedling into a net pot, and insert the net pot (with its neoprene collar) into the lid of the aeroponic chamber. The bare root tips just under the plug will immediately be exposed to the mist as the next step begins.
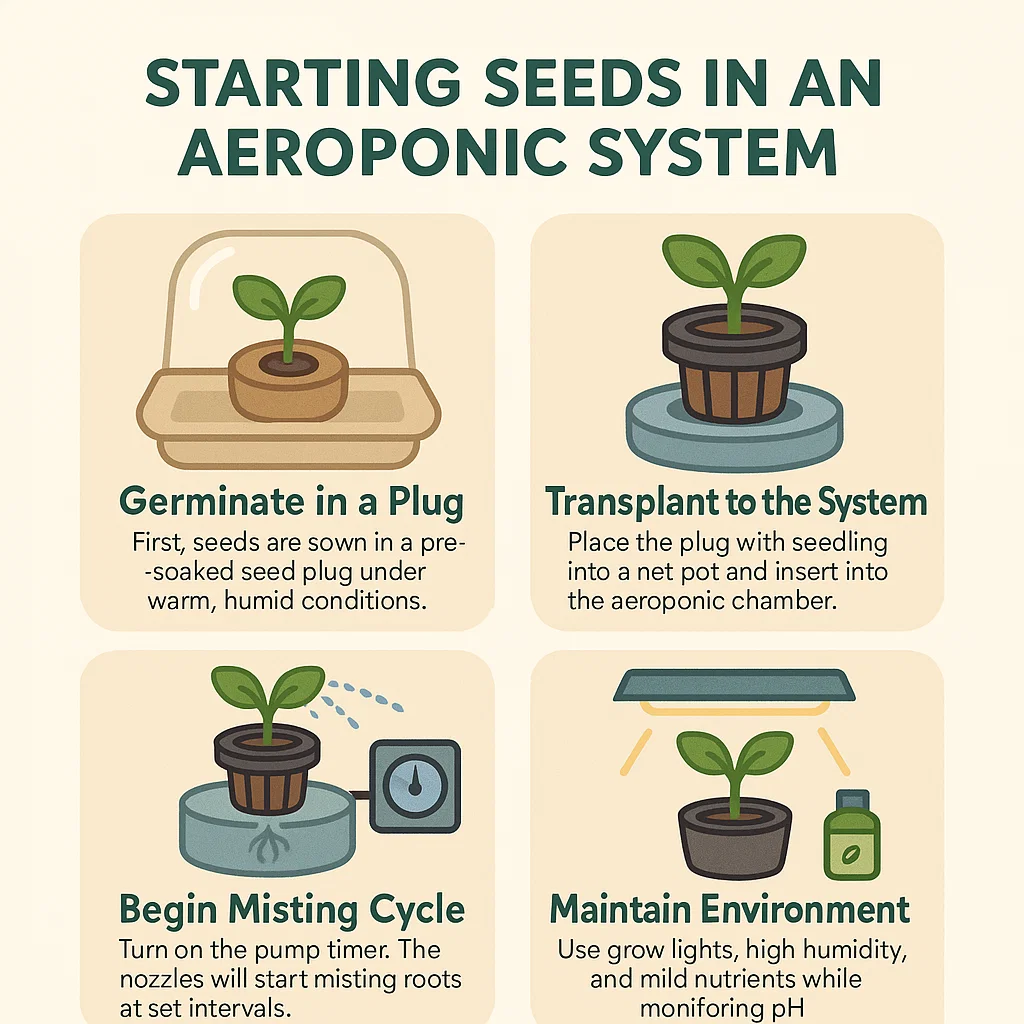
Begin Misting Cycle: Turn on the pump timer. The nozzles will start misting the roots at set intervals. For example, a common schedule is a short spray (5–15 seconds) every 3–5 minutes. Adjust timing so roots remain moist but not continuously wet. High-pressure systems tend to spray for only a few seconds each time since their mist is very fine.
Maintain Environment: Keep humidity high around the leaves (a dome or spritzing helps early on) and maintain ideal temperatures. Full-spectrum grow lights should be on for 14–16 hours per day initially. Monitor the solution’s pH (aim ~5.5–6.3) and nutrient strength (start with a mild dose, around 1/4 to 1/2 normal strength for delicate seedlings).
Over the next week or two, roots will grow longer and thicker as they drink in the frequent mist. You’ll see new leaves forming quickly. Compared to planting in soil, seedlings started this way typically develop stronger fibrous roots from day one and can be ready to transplant weeks earlier.
Key Benefits of Aeroponic Seed Starter
In 2025, aeroponics is recognized as a climate-smart and resource-efficient technology. Studies show that aeroponic seedlings grow up to 60% faster and develop 30–50% larger root masses than those started in soil. These advantages make aeroponic systems ideal for both commercial propagation and home gardening.
Explosive Root Development: Without soil to impede them, roots grow straight and densely. The constant fine mist keeps them aerated and moist, promoting a massively fibrous root system. For example, one comparison found aeroponic plants had 39 times the fresh weight of stems and leaves and 64 times the root mass versus soil-grown counterparts in the same period. Dense roots mean stronger plants later.
Faster Growth & Germination: Seedlings often sprout and grow more quickly. With direct nutrient access and optimal oxygenation, many aeroponically started seeds germinate days sooner than those in soil. Vegetative growth accelerates, too. Industry tests report aeroponic yields 30–40% higher than soil or standard hydroponics under similar conditions. In other words, seedlings grow into robust plants more quickly, shortening the time to harvest.
Healthier Seedlings: The sterile, soil-free environment virtually eliminates soil-borne diseases like damping-off, root rot, and pests (fungus gnats, etc.). Aeroponics avoids the “dirty” risks of soil that commonly afflict tender young plants. Starting seeds in aeroponics means each plant gets identical, clean conditions. The result is uniformly strong transplants with a high survival rate once moved outdoors or to a larger grow system.
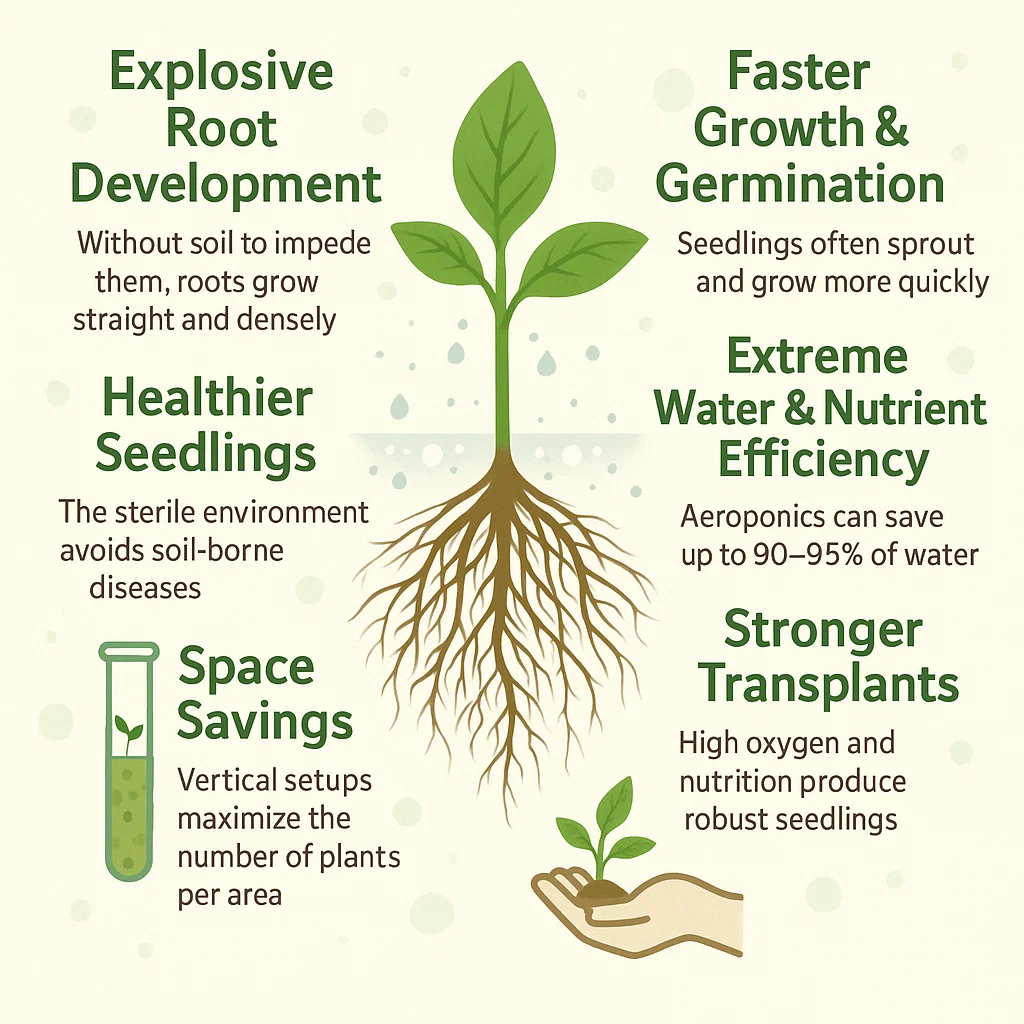
Extreme Water & Nutrient Efficiency: Aeroponics can save up to 90–95% of water compared to soil cultivation. All the nutrient solution is in a closed loop, so little is lost to the environment (only evaporation or plant uptake). In one estimate, a leafy green tower uses only ~3.7 liters (1 gallon) of water per day. Nutrients are delivered precisely to the roots in every misting, so wastage is minimized. For instance, an aeroponic system might use only 10% of the water and 30% of the fertilizer that a soil grow would require for the same yield.
Space Savings: Aeroponic systems excel in compact areas. Vertical tower setups can grow dozens of plants in a footprint far smaller than a conventional garden. One tower system boasts up to 52 plants per square meter, saving roughly 90% of the space needed for the same crop in soil. This makes aeroponics ideal for small greenhouses, balconies, and urban farms where space is at a premium.
Stronger Transplants: The combination of high oxygen roots and constant nutrition yields seedlings with thick stems and abundant leaf growth. Such transplants handle shock better. In fact, some growers note that seedlings started aeroponically resist later stresses (drought, pests, etc.) more successfully – presumably because their roots were so well-oxygenated early on.
In summary, aeroponic seed starters give plants an unbeatable jump-start: healthier roots, accelerated growth, and massive resource savings. These benefits make aeroponics particularly attractive for busy gardeners, commercial growers, and anyone seeking uniform high-quality starts for their crops.
Setting Up Your First System
As of 2025, ready-to-use home aeroponic systems are available from brands like AeroGarden, iDOO, and Gardyn, ranging from small countertop kits to advanced commercial units. DIY enthusiasts also build systems for under $100–$150, using common components available online or at garden stores.
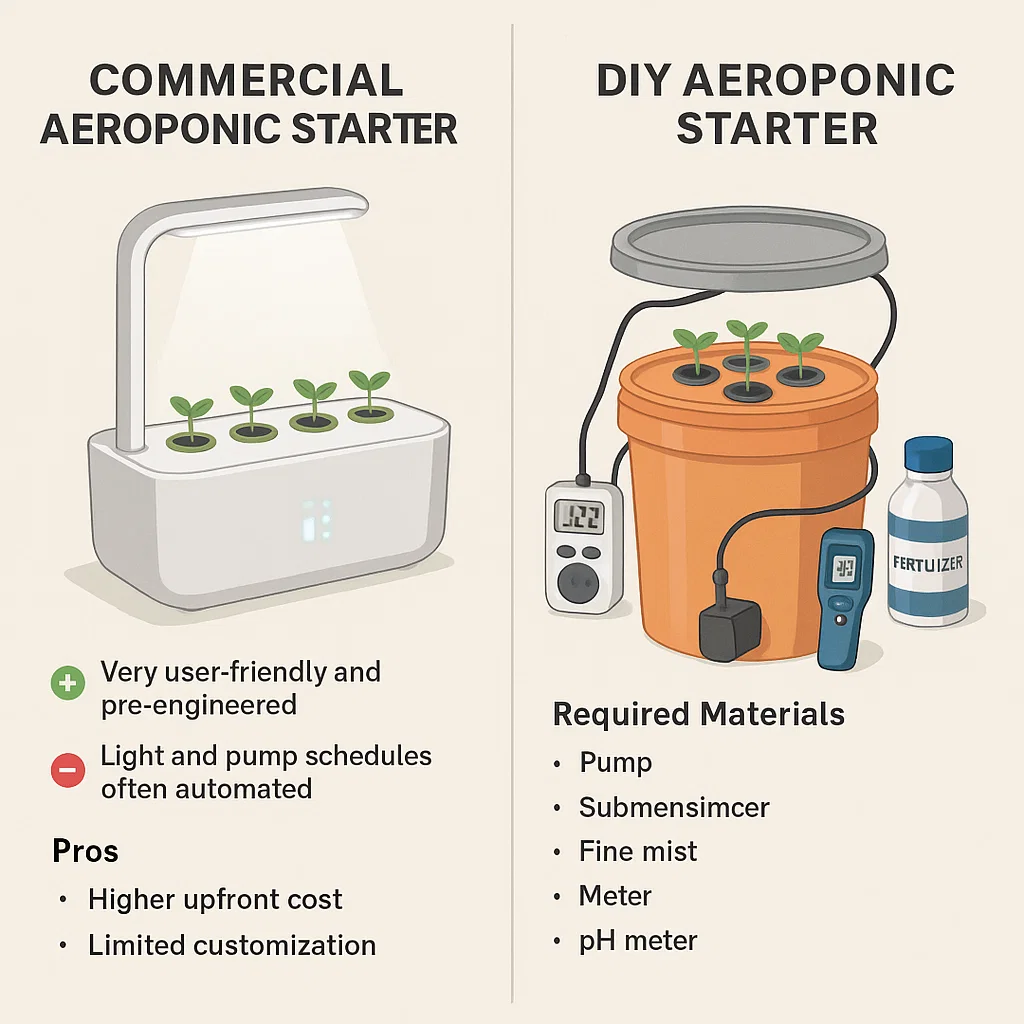
Option 1: Commercial Aeroponic Starters. Many companies sell all-in-one seed starters (some marketed as hydroponic kits). Examples include AeroGarden, JuiceBox, and various “tower garden” units. These typically come as complete kits with pumps, lights, reservoirs and pre-cut net pots. Pros: Very user-friendly and pre-engineered. Light and pump schedules often automated. Cons: Higher upfront cost; limited customization; often use deep-water hydroponics for the main phase (though some have aeroponic germination modes).
Option 2: DIY Aeroponic Starter. You can create a simple aeroponic setup with basic parts. This can be very cost-effective and scalable, but requires more work and some tinkering. A typical DIY bucket system (also called a “bucket aeroponics” or “kratky” hybrid) is often enough for seedlings.
Required Materials (DIY example):
A food-grade container (e.g. 5-gallon bucket) with a tight-fitting lid.
Net cups (plastic pots) sized to fit in holes cut in the lid. Neoprene or foam collars to hold cups in place and seal around stems.
A small submersible pump (12V or mains) that fits in the bucket.
For high-pressure aeroponics (HPA), a specialized mist pump is used; for low-pressure (LPA), a regular pump plus drip rings or spray nozzles can work.
Fine misting nozzles or spray ring(s) mounted under the lid to distribute nutrient mist. (360° rotating spray heads or multiple jets are common.)
Tubing to connect pump to nozzles (and any fittings). Bulkhead fittings keep the system watertight.
A digital timer that can switch power on/off in short bursts (seconds to minutes). Standard wall timers (1-min increments) usually can’t pulse quick enough.
A pH meter (and EC/TDS meter) for checking solution strength and acidity. (Optional but recommended for precision.)
Growing medium: Starter plugs (rockwool, coir, peat pellets, etc.) for germination.
Nutrient solution: Seedling-formulated hydroponic fertilizer. Also pH adjustment chemicals.
(Optional) Air stone and air pump for extra oxygen, and a water chiller (especially in warm rooms).
These are the core parts. As one guide summarizes, a simple 5-gallon aeroponic bucket may include net pots with collars, a pump, tubing, mist nozzle(s), and a timer. All these pieces can be assembled in a standard bucket to create a home aeroponic system.
Assembly (DIY 5-gallon bucket example):
a. Prepare the Lid: Cut holes in the bucket lid for net cups. Fit the neoprene collars into these holes so each cup will be held snugly with roots below.
b. Install Nozzles: Mount the misting nozzles or spray ring on the underside of the lid, positioned to cover all net pots. Connect them to the pump via tubing. A filter sock or mesh on the pump intake will trap debris and help prevent clogs.
c. Set Up Pump & Timer: Place the pump (in the bucket or external reservoir) and plug it into the timer. Route the tubing up to the nozzles. Program the timer to short cycles (for seedlings, try ~5–15 seconds on, 3–5 minutes off initially).
d. Mix Nutrient Solution: Fill the bucket with water and add nutrient fertilizer at a gentle seedling strength (e.g. 1/4 normal dose). Use the pH meter to adjust pH to about 5.5–6.2. (Seedlings prefer a slightly acidic solution around 5.5–6.0.)
e. Sanitize: Before adding plants, sanitize the system. A common approach is to drain the solution and flush the bucket and tubing with a diluted bleach or hydrogen peroxide solution, then rinse well. This kills any pathogens or algae.
f. Test Run: Run a test cycle to ensure the spray uniformly wets the root area and no leaks occur. Verify the spray is fine mist (not drenching). Adjust nozzle positions or timer as needed.
Initial Setup Checklist:
- Inspect and clean all components (sanitization prevents disease).
- Mix nutrient solution correctly (start weak for new seedlings).
- Set timer for frequent misting but allow drying periods (to avoid root rot).
Check temperature: roots like it cool (~18–20°C). If water warms (>68°F), a chiller or positioning in a cool spot helps prevent disease.
Arrange grow lights: for young seedlings, lights should be bright but not too close (to avoid burning). Aim for ~14–16 hours of light per day to prevent legginess.
Once set up, you simply place germinated plugs in the net pots and let the system run. The pump will mist the roots regularly, and you only need to top off solution levels or adjust nutrients every week or two. Many growers report that after planting, the plants take off on their own with little extra work.
Best Plants
Aeroponic systems excel with fast-growing, small-to-medium plants. Common successful candidates for seed-starting include:
Leafy greens: Lettuce, kale, spinach, Swiss chard, arugula, etc. These have small root masses and germinate quickly. (Many lettuce varieties can be ready in just 3–4 weeks of leaf harvest in aeroponics.)
Herbs: Basil, parsley, cilantro, mint, dill, oregano, and other herbs grow very well. They love the high oxygen and moisture and can be snipped frequently.
Fruit veggies: Tomatoes, peppers, cucumbers, strawberries, etc. These larger plants benefit from the vigorous start and strong roots, though they may need support when bigger. (Some compact or bush varieties do especially well in aeroponic setups.)
Vining crops (careful): Zucchini or cucumbers can be grown if trellised, but only in larger systems.
In general, plants with shallow root systems or that are normally started as transplants are ideal. Aeroponics is often used commercially for lettuce and herbs for this reason. On the other hand, true root crops and heavy plants are not recommended.
For example, carrots, potatoes, turnips, onions, garlic, beets and other tubers or deep root veggies do not do well in aeroponic towers. These crops need loose soil and pressure to form good roots, which the rigid tower ports cannot provide. In fact, one vertical farm warns against trying turnips or similar roots in aeroponic towers, noting they outgrow the ports and even cause water leaks.
In summary, use aeroponics for leafy greens, herbs, and many fruit/vegetable seedlings. Avoid plants that normally require deep soil or heavy anchoring. As a quick guide: Excellent candidates are lettuce, kale, basil, cilantro, parsley, tomatoes, peppers, cucumbers and the like. Best avoided are carrots, potatoes, onions, and other classic root vegetables.
From Seed to Seedling: Stage-by-Stage Guide
In 2025, automation has simplified the germination-to-transplant process. Smart aeroponic seed starters now regulate mist cycles, humidity, and nutrient concentration automatically, making seed propagation easier than ever
Stage 1
Germination (Days 1–5): Sow seeds in a moist starter plug (rockwool cube or peat pellet) and keep under warm, humid conditions (a plastic dome or bag helps). The plug should be kept lightly damp (not waterlogged). Some growers pre-soak seeds if needed.
You may keep the pump off at this stage or mist very gently, as the plug itself provides moisture. Check daily: seeds like lettuce/basil usually sprout in 2–5 days. High humidity (80–90%) favors fast germination. Once you see the first tiny roots emerging at the bottom of the plug, move to the next stage.
Stage 2
Seedling & First Leaves (Days 5–14): Place the germinated plug into the aeroponic system’s net pot and start the misting cycle. Keep misting short and frequent (e.g. 5–15 seconds on, ~3–5 minutes off). The roots will quickly grow out of the plug into the mist. At this point, use a mild nutrient solution. For the first week or two, use about half-strength of the recommended nutrient concentration to avoid burning tender roots.
(Many growers suggest an EC of ~0.7 or 400–600 ppm for seedlings, though exact values vary by formula.) Adjust pH to ~5.5–6.2 daily. Provide bright light: position grow lights 4–8 inches above the seedlings. Within a week, the seedlings should produce true leaves and look perky. Watch root color: healthy aeroponic roots will be crisp and white. (If they go brown or slimy, refer to troubleshooting below.)
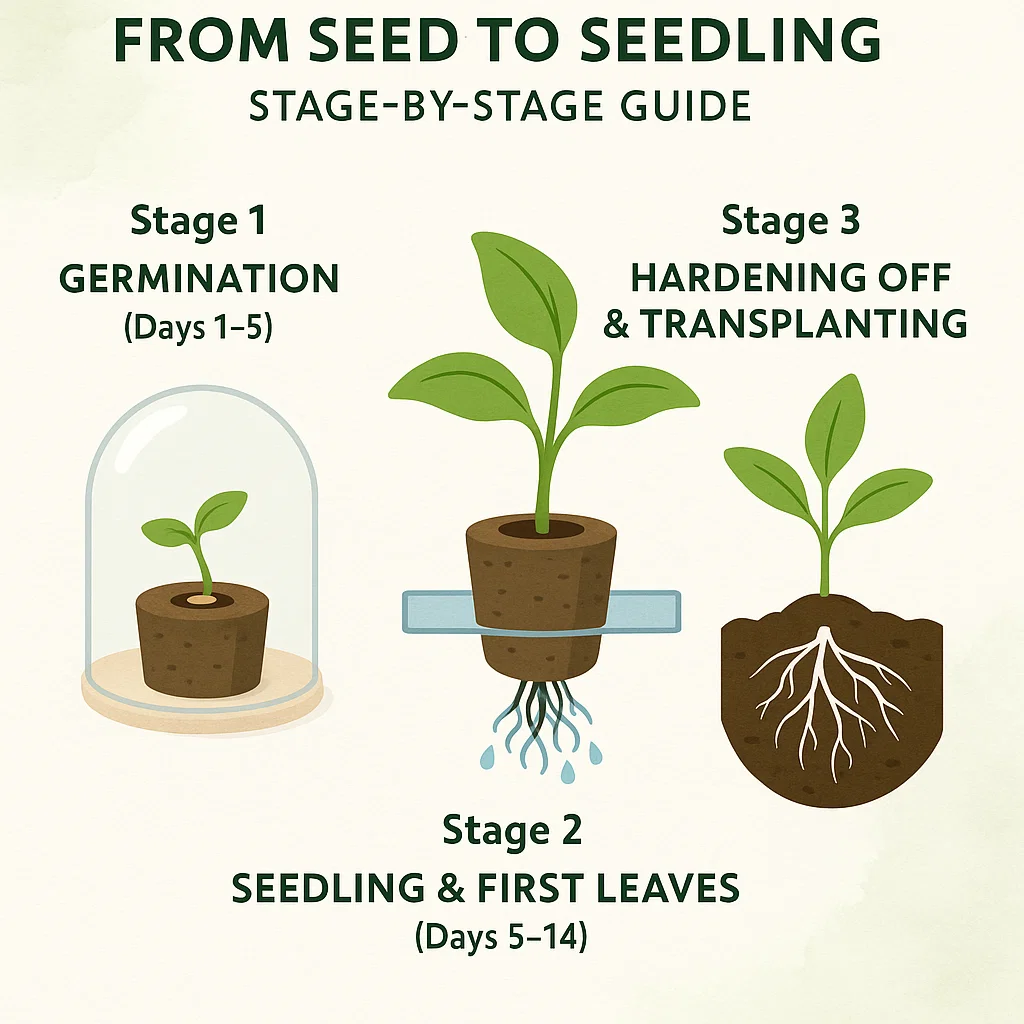
Stage 3
Hardening Off & Transplanting: Once each seedling has several true leaves and a strong root network (often 2–3 weeks from sowing), it’s ready to move on. The next step depends on your goals:
Transplant to Soil or Another System: Remove the plug gently, keeping roots intact, and plant into a pot or garden bed. The vigorous root system from aeroponics usually transitions well. To avoid shock, gradually reduce misting and increase airflow for a couple days before transplant. Dampen the soil or potting mix well at planting.
Continue in Aeroponics: Some gardeners grow full crops aeroponically. You may simply let the plants mature in the system, given enough space and nutrients. However, many aeroponic seed starters are mainly for nursery use, with crops finishing in a larger hydroponic or soil system.
Generally, seedlings started aeroponically take fewer days to reach transplant size than those started in soil. For example, lettuce seedlings that might take 4–5 weeks in soil can be ready in 3–4 weeks in aeroponics. Commercial growers prize this head start because it means more crop cycles per year.
Troubleshooting Common Issues
i. Root Rot (Brown or Slimy Roots): Root rot can occur if water becomes too warm or pathogens enter the system. High temperatures reduce oxygen and allow fungi to grow. If roots look brown or smell bad, lower the reservoir temperature, improve aeration, and clean the system with diluted hydrogen peroxide or bleach. Keep water cool (18–20°C), change nutrients often, and sanitize regularly to prevent it.
ii. Clogged Misting Nozzles: Minerals, salts, or root debris can clog fine spray jets, one of the most common aeroponic issues. Always use a filter on the pump intake, flush the system often, and clean clogged nozzles by soaking in vinegar or acid overnight. Replace nozzles periodically to maintain good misting.
iii. Nutrient Deficiencies or Imbalances: Seedlings may show yellow or pale leaves if the nutrient mix is too weak or strong, or if pH drifts. Keep pH between 5.5 and 6.5 and start with a mild solution (~400 ppm). Adjust gradually as seedlings grow and flush with fresh solution if symptoms appear.
iv. Algae Growth: Light entering the reservoir encourages algae. Keep the chamber light-proof and clean any green film immediately. Flush and sanitize the system, then rinse well before restarting.
v. Other Issues: Check for leaks, loose fittings, or power outages that can dry roots quickly. Keep spare nozzles and clean filters weekly. Ensure lights are at the right distance to prevent leggy seedlings.
| Issue | Main Cause | Solution |
|---|---|---|
| Root Rot (Brown or Slimy Roots) | Warm water, poor aeration, or pathogens | Cool reservoir (18–20°C), increase oxygen, clean with hydrogen peroxide or bleach, and sanitize regularly |
| Clogged Misting Nozzles | Mineral buildup or debris in spray jets | Use a filter on pump intake, flush system often, soak nozzles in vinegar or acid, and replace as needed |
| Nutrient Deficiencies | Weak/strong nutrient mix or pH imbalance | Keep pH 5.5–6.5, start around 400 ppm, adjust gradually, and flush with fresh solution when needed |
| Algae Growth | Light exposure to reservoir or tubing | Light-proof the chamber, clean any green film, sanitize with mild bleach or peroxide, and rinse well |
| Other Issues | Leaks, power loss, or poor lighting | Check seals and power, keep spare nozzles, clean filters weekly, and adjust light distance to prevent legginess |
Is This Right for You?
Starting seeds with aeroponics involves a bit more tech than simply filling trays with soil. But for growers who want the healthiest, fastest seedlings, the payoff is big. Aeroponic starting is ideal for:
- The tech-savvy gardener who enjoys experimenting with hydroponic systems.
- Urban farmers and indoor gardeners with limited space, as aeroponics packs many seedlings into a small area.
- Commercial growers and nurseries seeking uniform, vigorous transplants to increase yield and consistency.
- Anyone dealing with damping-off problems (a common seedling disease) and wanting a sterile start.
On the other hand, small hobbyists who prefer simple, low-tech methods might find soil trays easier to manage at first. There is an upfront investment in equipment, and a learning curve for timing and nutrient balance.
Conclusion
In conclusion, an aeroponic seed starter can transform your garden’s kickoff. With up to 95% water savings and visibly stronger plants, many users swear by it. If you’re willing to learn the basics of misting cycles and solution management, the results are worth it: faster germination, deeper roots, and lush seedlings that give you a real head-start. The science and success stories are clear – aeroponics is a cutting-edge tool for growers who want the very best start for every seed.